A Rey of sun for Star Wars Day

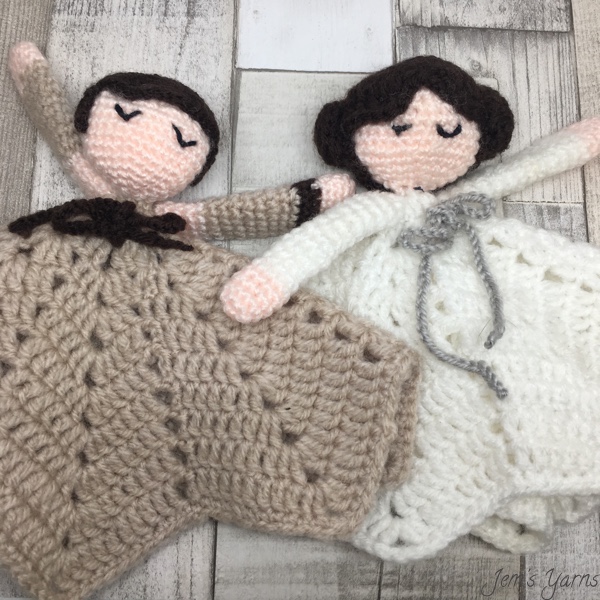
It’s May the fourth and Star Wars Day! I am a huge Star Wars fan, so one of the first patterns I ever followed was for Princess Leia. I found it easy to follow, and she’s a cute lovie who sits on my headboard.
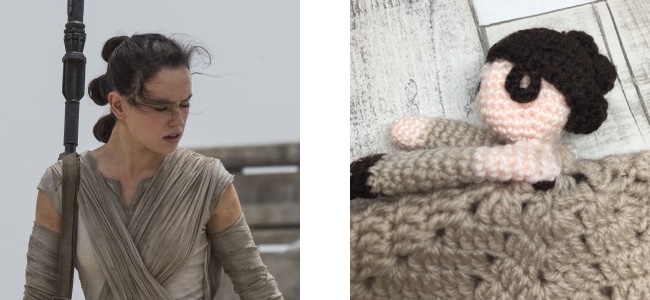
Back at the release of The Force Awakens, I decided to adapt the pattern to make Rey. I absolutely love this character, she’s strong and confident, and she’s a tinkerer; she’s right up my street.
Free Pattern: Star Wars Rey Lovie Pattern
Pattern Notes
This pattern references the Princess Leia pattern from Stuff Susie Made, so make sure to have a look at that page too. The dress is made in joined rounds with a slip stitch join, however the head and arms can be made in continuous rounds if you choose to do so. I used a 4mm hook for the dress as it’s quite lacy, then went down to a 3mm hook for the head and arms to avoid the stuffing showing in holes.
Crochet terms
I’ve written this pattern in American terms to go hand in hand with the reference pattern. (I usually write in British terms, but that would be too confusing here). Here’s what the abbreviations mean with UK terms alongside.
| Term | US term | UK terms |
|---|---|---|
| dc | double crochet | treble crochet |
| ch1 | chain 1 | chain 1 |
| sc | single crochet | double crochet |
| sc inc | single crochet increase | work two double crochet into the same stitch |
| sl st | slip stitch | slip stitch |
The number of stitches in each round is given in brackets, it’s a good idea to keep count!
Materials
Double knit weight yarn in flesh tone, beige and dark brown. I used Stylecraft Special DK in Soft Peach, Parchment and Dark Brown respectively. You also need a 4mm hook, a 3mm hook, toy stuffing and black embroidery thread.
Dress and head
Follow the pattern at Stuff Susie Made for the dress and head, using beige and flesh yarn. Remember to leave a long tail of yarn from the head as you’ll need this for sewing later.
Hair
The hair piece is stitched on top of head like a skull cap. You first make a circle, then add a loop of chains on each side of the hair. You also need to make up three small buns which will later be stitched in a vertical line on the back of the head.

Using dark brown:
- work 6 sc into a magic ring, join round with sl st. (6)
- sc inc into each st (12)
- *sc, sc inc* repeat 6 times (18)
- *2 sc, sc inc* repeat 6 times (24)
- *3 sc, sc inc* repeat 6 times (30)
- *4 , sc inc* repeat 6 times (36)
- *5 sc, sc inc* repeat 6 times (42) Fasten off.
Now were are going to make a chain for the wisp of hair over the ear, the back of her hair and then the wisp of hair over the opposite ear.
- ch10, sl st to next sc, ch2 (counts as dc), 23 dc, ch10 sl st in next sc (24 dc and two ch10 loops)
- Turn your work, ch2 (counts as dc), 23 dc (24 dc) Fasten off.
Large bun
- work 6 sc into a magic ring (6)
- sc inc into each st (12)
- sc into each st (12) Fasten off.
Small buns - make two Work rounds 1 and 2 of the large bun.
Arms - make two
Again, this pattern is based on the pattern for Princess Leia, except with more colour changes as Rey has bare shoulders and wears a wrist cuff on one arm. For her left arm, follow this pattern, then for her right arm follow it again but rounds 6 and 7 should be in beige yarn.
- In flesh tone, work 5 sc into a magic ring (5)
- sc inc in every sc (10)
- to 5. sc in every sc (10)
- Switch to dark brown and sc in every sc (10)
- sc in every sc (10)
- Switch to beige and sc in every sc (10)
- to 15. sc in every sc (10)
- Switch to flesh tone and sc in every sc (10)
- to 19. sc in every sc (10) Fasten off.
Belt
Work a chain in dark brown yarn until it measures around 35 cm.
Making up

- Sew hair to head. You can choose to leave the ch10 wisps of hair free or use a stitch at in the middle of the chain to fix them to the sides of Rey’s head.
- Sew the three buns to the back of the head in a vertical line.
- Sew head to centre of the dress. I found it easiest to fold the dress into half and work the tail of yarn from the head through several stitches of the dress. You’ll find a way to do this securely, I’m sure.
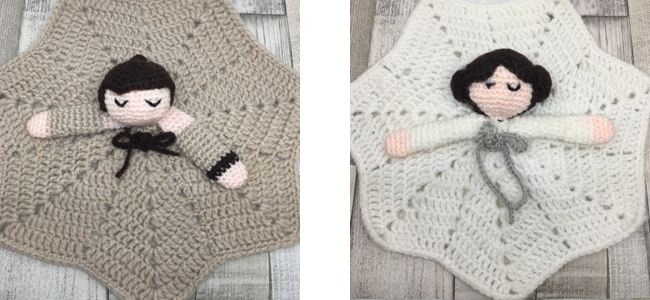
- Sew the arms to the dress underneath the head. The one with the line of dark brown is Rey’s left arm.
- Thread the belt through the stitches of round 5 or 6, whichever looks better. You can then pull the belt a little tight so that you bunch up the early rounds of the dress to make the impression of a body. You can tie the belt in a bow.
- Embroider a face. The original pattern shows how to make a face using some cute buttons, or you can embroider two half moon shapes like I have. I like mine like this, as it is totally safe for toddlers and looks like the doll is sleeping.
And that’s it! Enjoy your new Rey doll. I’m now going to use Star Wars Day to finally get around to watching Rouge One. Somehow I completely missed it in the cinema last year; it’ll be the first Star Wars film I haven’t seen in the cinema. I’m a little sad about that (can’t believe I missed it) but now I’ve got a Rey dolly to comfort me!
